
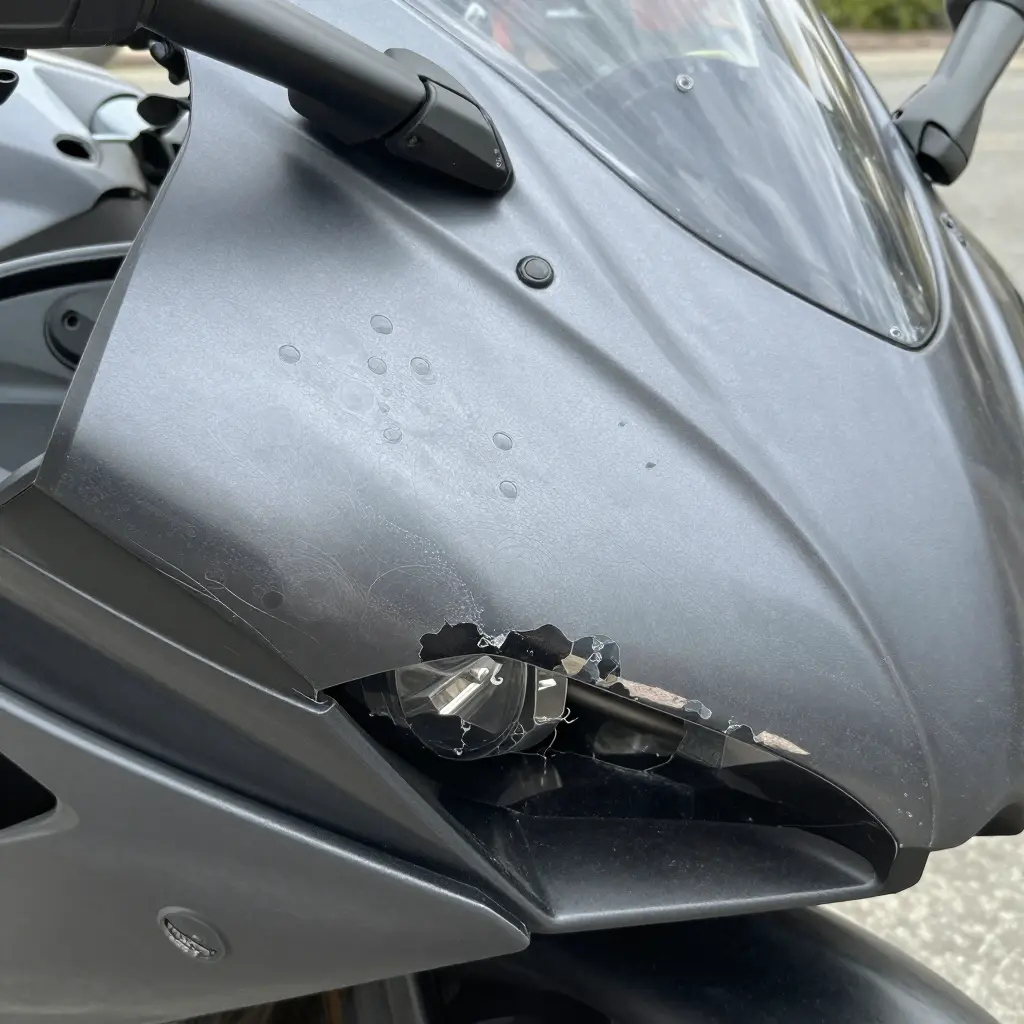
Clear coat blistering on aftermarket fairings shows up for everyday drivers, motorcycle riders, and repair shops alike. The defect appears as raised, cloudy bubbles under the top layer of paint, and it means the clear coat is already failing. Aftermarket fairings are more prone to it than factory parts because manufacturing and refinishing quality varies so much between suppliers. Owners often notice the bubbles shortly after installing vehicle modifications, when the new finish is supposed to last for years.
Left alone, the blisters spread, hold moisture against the base coat, and let UV light and contaminants reach the paint underneath. Fixing the damage usually means sanding the area, drying it out, and repainting. The bill depends on how much surface is affected, which paint system is used, and whether the panels come off the bike for a proper finish.
What Is Clear Coat Blistering?
Clear coat blistering is a paint defect in which the transparent topcoat separates from the paint beneath it and lifts into raised, cloudy bubbles. Moisture or solvent gets sealed under the film. Because the clear coat is non-porous, whatever is trapped inside has nowhere to go; it expands with heat and pushes the surface up. The result is a bumpy, milky-white texture that dulls the finish.
Aftermarket fairings blister more often than factory finishes for fairly predictable reasons. Factory paint goes on in dust-free booths where temperature, humidity, and cure times are controlled. Aftermarket fairings are often painted in garages and small shops, sometimes over primer that was not fully dried. Too little flash time between coats traps solvent, and humid air adds moisture. Flexible panels and heavy film build raise the risk further. Any of these leaves solvent or water under the clear coat, which is why blistering shows up so often after installing aftermarket parts.
The diagram below shows a simplified cross-section, stacked from the structural base material up through the primer, base color coat, and clear coat. The dome-shaped blisters sit at the boundary between the clear coat and the base color coat, the exact spot where moisture and solvent collect and push the topcoat upward.

Knowing what triggers clear coat blistering on aftermarket fairings, whether you handle DIY car modifications yourself or hand the work to a shop, makes it easier to protect the finish before damage starts.
| Cause | How It Happens | Warning Signs | Prevention |
|---|---|---|---|
| Moisture Contamination | Water or humid air gets trapped under the clear coat during spraying or storage. | Milky white or cloudy patches; bubbles appearing shortly after painting. | Spray in low-humidity conditions and use moisture traps near the booth. |
| Solvent Entrapment | Solvents in the paint or clear coat cannot flash off and stay sealed beneath the surface. | Soft, gummy areas; blisters forming within days of application. | Allow proper flash time between coats and avoid heavy, wet passes. |
| Inadequate Surface Preparation | Dust, grease, or silicone left on the fairing blocks proper adhesion. | Blisters concentrated near edges, seams, or contaminated spots. | Degrease, sand, and wipe with a tack cloth before any coating. |
| UV Degradation | Prolonged sun exposure breaks down the clear coat’s chemical bonds over time. | Faded, chalky finish; small blisters on top-facing panels. | Apply UV-resistant clear coat and use wax or a cover during storage. |
| Low-Quality Clear Coat | Cheap or improperly mixed products cure poorly and trap gas. | Uneven curing, peeling, and early blister clusters. | Use reputable brands and mix hardener to the exact ratio. |
| Heat Exposure | High heat from exhaust, engines, or direct sun expands trapped air and moisture. | Blisters near hot components or after intense sun exposure. | Add heat shielding and let parts cool before coating. |
Repaint Cost at a Glance
Repair costs range from a cheap DIY touch-up to a full fairing replacement, and the gap between them is wide enough to change what you decide to do. The table below shows typical repaint costs for the most common fixes.
| Repair Category | Average Cost (USD) |
|---|---|
| DIY Spot Repair | 40 |
| Professional Spot Repair | 150 |
| Single Fairing Panel Refinish | 250 |
| Full Fairing Set Repaint | 600 |
| Full Fairing Replacement | 1200 |
Costs climb fast once you move past spot repairs, so catching blisters early is far cheaper than waiting until the whole fairing set needs work.
DIY vs Professional Repair: Which Fixes Clear Coat Blistering Best?
Where your money goes depends on how much of the fairing you handle yourself. If you enjoy hands-on work, our guide to do-it-yourself car modifications covers techniques that apply to fairing work too.
| Repair Approach | Typical Cost Range | Skill Level Required | Expected Result |
|---|---|---|---|
| DIY spot sanding and clear coating | $30-$80 (materials only) | Beginner to intermediate | Repairs small blisters; slight texture or haze may remain |
| DIY full-panel repaint | $80-$250 (paint + clear) | Intermediate to advanced | Even finish with careful prep; risk of runs or orange peel |
| Professional spot repair | $150-$300 | Professional technician | Seamless blend that matches factory texture and gloss |
| Professional single-panel refinish | $300-$600 | Professional technician | Flawless, uniform finish on one panel, usually warranted |
| Professional full fairing set repaint | $800-$2,500 | Professional technician | Show-quality, consistent color and gloss across all fairings |
DIY saves money but demands patience and practice; professional work costs more and gives you durability and a factory-grade color match. How much that matters depends on what the fairing set is worth to you.
Preventing Clear Coat Blistering on Aftermarket Fairings
Prevention costs far less than repair, and most blistering starts long before the spray gun comes out. Prep comes first: wipe every panel with a wax-and-grease remover and let it dry completely. Any moisture, oil, or dust left under the paint becomes a blister waiting to form.
Humidity control matters just as much. Spray primer and clear coat in a low-humidity, well-ventilated space, ideally at 40 to 60 percent relative humidity. Moisture in the air gets sealed under the film, expands when it heats up, and lifts the finish.
Use a clear coat made for flexible plastic substrates, since aftermarket fairings flex and cheap products crack. Measure hardener accurately and stay inside the recoat window. Finish with a ceramic coating or a quality wax, reapplied every few months, to block UV rays and water. If the fairings sit on a modified bike, reviewing your coverage for modified vehicles helps protect the investment.
Frequently Asked Questions About Clear Coat Blistering on Aftermarket Fairings
Can clear coat blistering be repaired without a full repaint?
Yes, in many cases. If the blisters are small and localized, a shop can sand down the affected area, treat the trapped moisture or contamination, and reapply a fresh clear coat. But if blistering spreads across large panels or reaches the base coat, a full respray is the more reliable fix.
How long does a clear coat repair last?
A properly done clear coat repair usually lasts three to five years, depending on sun exposure, washing habits, and product quality. UV-stable clears combined with regular waxing stretch that lifespan, while harsh chemicals or frequent pressure washing shorten it.
Does blistering return after repainting?
It can return if the root cause is ignored. If moisture, solvent, or poor surface prep triggered the original clear coat blistering, those problems must be corrected before repainting. Once the surface is fully dried and correctly primed, blistering rarely comes back.
How do I tell blistering apart from simple fading?
Fading looks like a dull, chalky, or lighter patch across the surface. Blistering shows raised bubbles, bumps, or cloudy pockets under the finish and may flake or peel when pressed. Fading is mostly cosmetic, while blistering signals trapped moisture or adhesion failure.
Do aftermarket fairings blister more than factory fairings?
Often, yes. Many aftermarket fairings ship with thinner, lower-grade clear coats and are painted in less controlled conditions, so they blister more easily. Factory fairings usually get better prep and thicker coatings. Replacement panels are expensive, so it is worth comparing repaint cost estimates against the price of a new set, and considering how a repaint affects resale value, before you commit.
Conclusion
Clear coat blistering on aftermarket fairings usually traces back to trapped moisture, poor surface prep, solvent that never flashed off, or long UV exposure. Left untreated, the bubbles spread, dull the finish, and break down the protective layer. You have options: a light sand-and-reclear for minor cases, spot refinishing for isolated blisters, and a full strip and repaint when the damage is widespread. A complete motorcycle fairing set typically runs from about $600 for a basic single-color respray to $2,500 for professional show-quality work, depending on panel count, paint type, and local labor rates.
Whether you are upgrading a bike or replacing worn plastics, the quality of the parts matters. Summitfairings (summitfairings.com) exports motorcycle fairings, listing over 3,000 styles across almost all motorcycle models at 10-40% less than other sites, with customer questions answered within six hours. Riders weighing how upgrades affect value may find it useful to understand whether modifications increase car value before committing. Fixing clear coat blistering early protects both the look of the bike and its resale potential.