

An aftermarket fairing kit looks like a simple bolt-on upgrade for a sportbike. Yet kits sold as model-specific still leave uneven gaps around the nose and side panels. That outcome is common and predictable, and it usually says nothing about a defective product or a careless owner.
A “direct fit” label does not guarantee flush panels. Panels are molded, and every mold carries its own small dimensional error. Factory plastics and aftermarket replacements seldom come from the same tooling, material, or tolerance window. Shipping stress, storage, and frame variance add to those differences, and small misalignments end up as visible gaps.
Below, we cover the manufacturing and installation reasons for those gaps, plus how to diagnose and reduce them. General DIY installation guides for modifications follow the same staged logic, and they are worth reviewing alongside the fairing-specific steps.
How Sportbike Fairings Are Meant to Fit
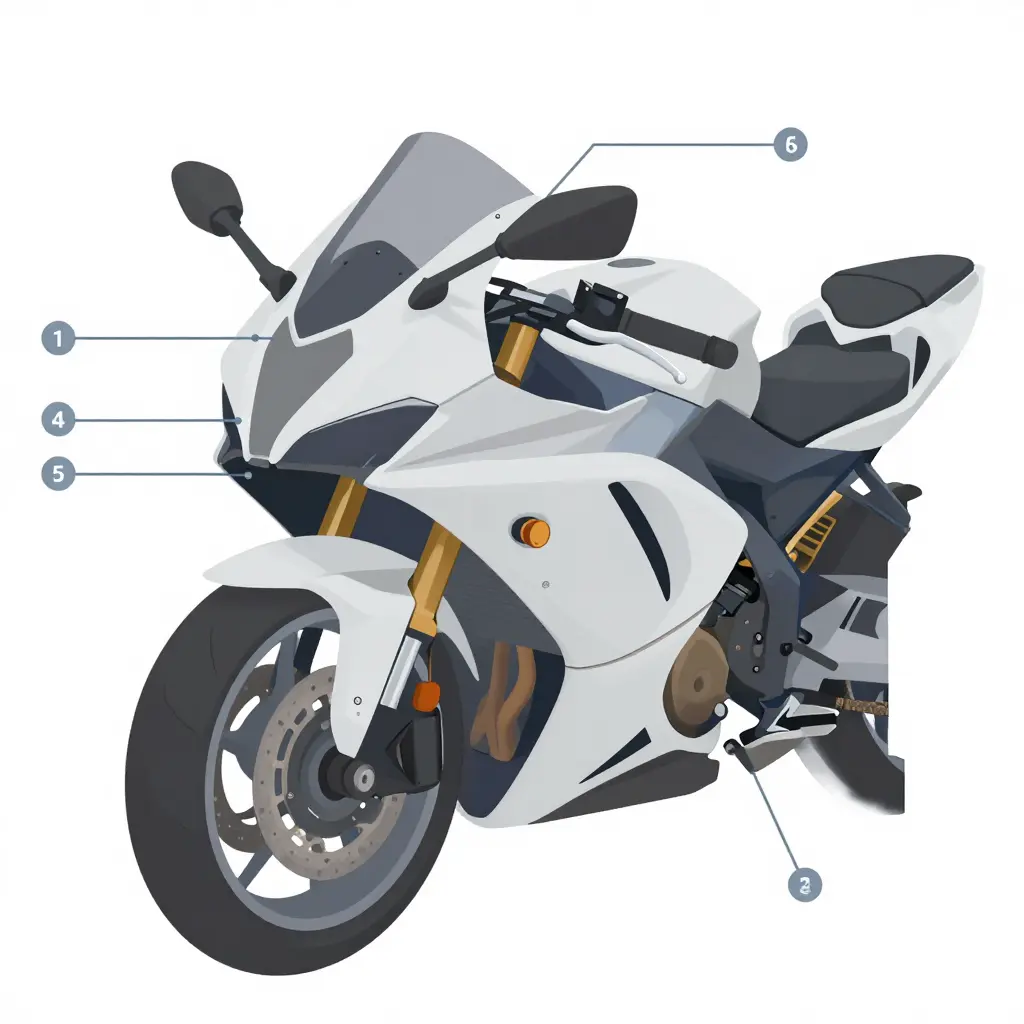
A sportbike fairing is not one shell but a set of interlocking panels. Each piece relies on its neighbors to hold shape and alignment.
The nose fairing (front cowl) sits at the front, housing the headlight and instrument surround. It meets the upper cowl along a horizontal seam near the top of the headlight opening. From there the upper cowl bridges to the side panels, which wrap the radiator and engine bay.
The lower belly pan closes the underside and connects to the side panels along a low, longitudinal seam.
Adjacent panels meet at engineered seams that should stay even in width from end to end. Uneven nose panel gaps or side panel gaps usually mean a panel is sitting out of position rather than defective.
Three pieces of hardware set alignment. Molded mounting tabs slot into receiving points. Rubber or plastic grommets absorb vibration and allow slight movement. The stay bracket, a metal arm bolted to the frame, fixes the reference position for the whole assembly.
A complete motorcycle fairing kit ships panels and hardware together for that reason: alignment is a property of the system, not of any single panel. Bend the stay bracket or lose a grommet, and every seam downstream shifts. General installation practices are worth reviewing before you start checking seams.
Why the gaps appear comes down to how the two products are made. Tooling, tolerances, and finishing differ, and those differences decide how well one panel meets the next. That is why installing aftermarket bodywork usually takes more hand-fitting than bolting on OEM parts.
| Fitment Factor | OEM Fairing | Aftermarket Fairing Kit |
|---|---|---|
| Tooling origin and mold reuse | Original factory molds, tightly controlled | Reverse-engineered molds, often reused across batches |
| Panel thickness tolerance | Consistent, tightly held | Variable, sometimes thinner walls |
| Mounting tab alignment accuracy | Precise, indexed to frame | Approximate, needs bending or filing |
| Pre-drilled hole accuracy | Factory-aligned | Slightly offset, may need re-drilling |
| Finish/coating impact on seam gap | Thin even coat, consistent gap | Thick paint/clear can widen seams |
| Typical user pre-fitting work required | Minimal, bolt-on | Mock-up, trimming, shimming, enlarging holes |
Expect extra test-fitting, trimming, and shimming from an aftermarket kit, and treat small seam gaps as normal rather than a defect.
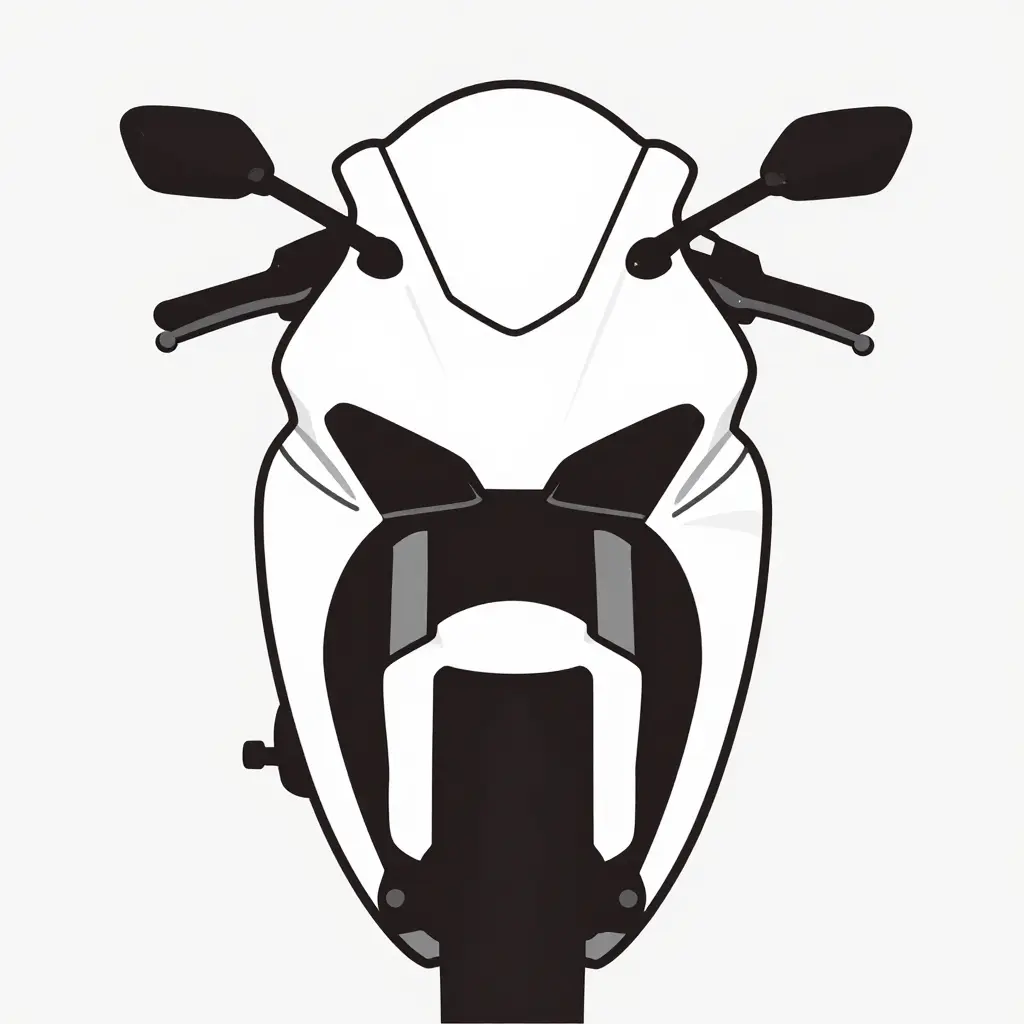
Manufacturing Tolerances and Mold Quality
Aftermarket sets rarely come off the original manufacturer’s tooling. Most are molded from a reverse-engineered OEM panel, a copy of another aftermarket set, or a mold reused across several model years. Each step carries the previous geometry forward and adds its own small error, so drift accumulates with every generation. Mold quality is the single largest variable in how closely a finished set matches the factory reference points.
Shrinkage during curing is one known source of that drift. Resin, fiberglass, and ABS laminates contract as they cool, so a mold that was not oversized to compensate releases panels slightly smaller than the original. Topcoat and primer add a second offset: uneven film build moves every edge, return, and mounting surface a fraction of a millimeter in or out.
How Small Errors Compound Along a Seam
Molded mounting tabs cause most of the trouble. A tab two or three millimeters off its intended location is harmless on a short bracket, but the same offset repeats at every downstream attachment point. By the time the tolerance chain reaches the nose, a few millimeters have become a sportbike fairing fitment gap of ten millimeters or more along a full-length seam.
These are cumulative mechanical effects, not assembly mistakes. A panel molded from worn tooling can leave a visible gap even when every fastener is correctly torqued, because the panel itself sits outside the original tolerance window. Reviewing proper installing aftermarket bodywork practices helps separate a real tolerance problem from a hardware problem.
Variables That Affect Fairing Fitment
A gap that will not close rarely has one cause. Whether you are replacing a cracked nose panel or refreshing the look of your sportbike, several factors stack up at once. Knowing what to inspect before and during installing aftermarket modifications saves hours of trial and error.
- Model year and generation differences
- Mold source and age of the tooling
- Panel material and overall stiffness
- Ambient temperature during installation
- Condition of the frame-mounted stay bracket
- Presence of aftermarket accessories
- Fastener type and grommet condition
- Shipping deformation of the panels
Any one of these looks minor on its own, and they rarely act alone. A warm afternoon, a tired stay bracket, and a slightly warped panel can combine to produce a gap that no amount of tightening will close. Working through the list one item at a time is the most reliable route to a factory-like fit.
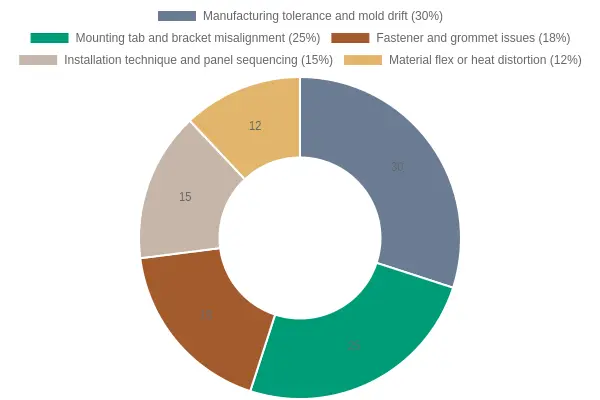
How to read this chart: Each slice estimates the share of fairing gaps traced to one root cause, so a larger slice means that factor is more often the culprit. Start with the biggest slices, manufacturing tolerance and mounting misalignment, because they account for most nose and side panel gap complaints.
Mounting Hardware and Fastener Variation
A panel’s alignment depends less on the fairing shell than on the hardware that anchors it. The stay bracket sets the structural reference point. Mounting tabs hold the panel against that reference. Rubber grommets absorb vibration and set the stand-off distance, and quick-release pins or shoulder bolts lock the assembly into place. When these parts are right, panel edges sit flush and side panel gaps stay even.
Small dimensional differences matter more than most riders expect. A thicker grommet pushes the panel outward; a thinner one pulls it inward. A long tab forces an edge past its intended line, and a tall bolt shoulder lifts the panel off the frame. Even a 1-2 mm variation at one point changes the gap along the entire adjacent edge.
A bent or worn OEM stay bracket is a common hidden cause of asymmetry. If a drop has tweaked the bracket, or years of vibration have fatigued it, one side of the panel shifts while the other stays true. The uneven gap then looks like an aftermarket fairing fitment problem even when the replacement shell is dimensionally accurate. Inspect and straighten the stay, and follow sound installation practices, before bolting on new panels.
Reading the Diagram
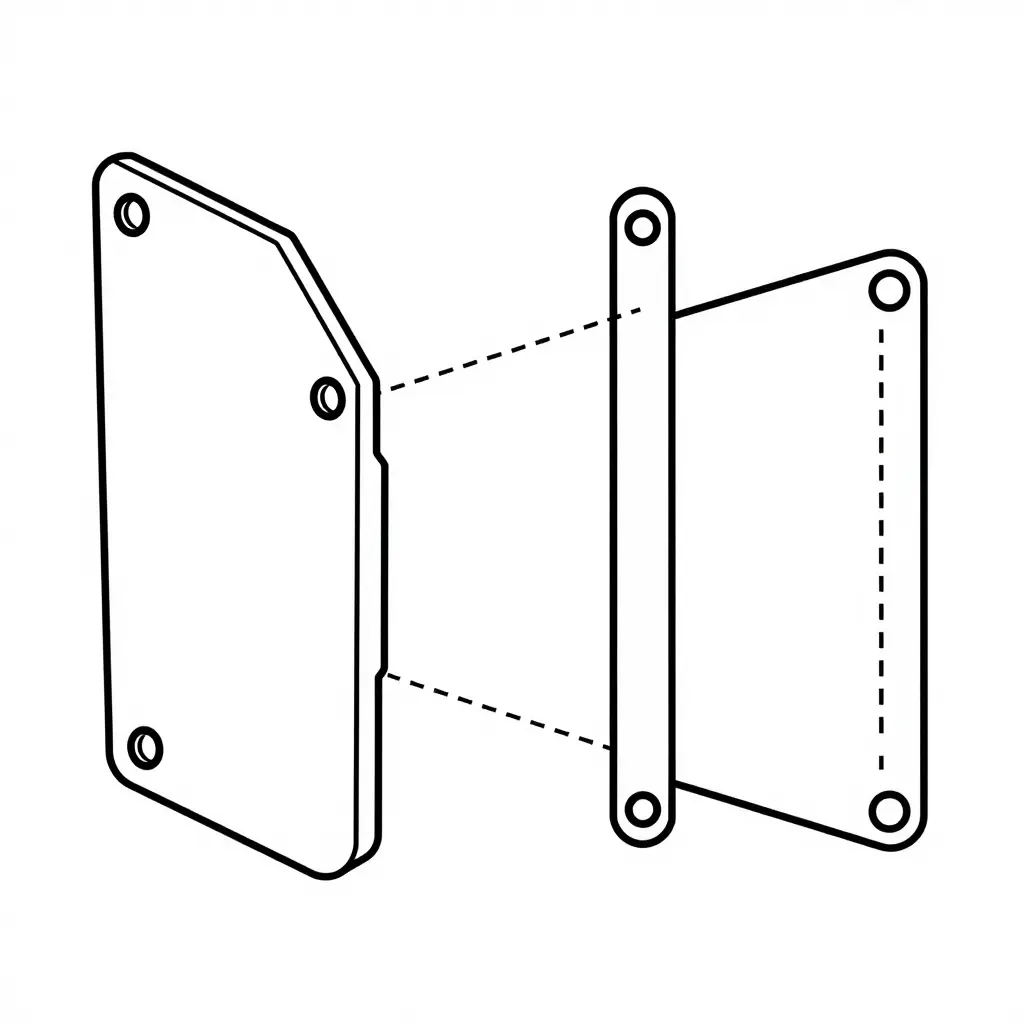
This line drawing isolates the two components that decide whether an aftermarket fairing sits flush or fights you: the panel on the left and the stay bracket on the right.
On the panel you can see:
- Molded mounting tabs – the protruding lugs that are supposed to drop straight into the frame side of the assembly. Their spacing is fixed at the factory.
- Grommet positions – the cushioning holes that absorb vibration and let the panel flex slightly instead of cracking.
On the bracket you can see:
- A frame-mounted stay – the tubular subframe that carries the nose panel on most sportbikes.
- Bolt holes – the receiving points whose centers must line up with the tabs.
The dashed guide lines carry the point. When a tab and its matching bracket hole share a common centerline, the panel pulls in evenly. When the reproduction tabs are molded a few millimeters off, or the stay is bent even slightly, the lines no longer meet. The panel can only move outward, and a gap opens. Understanding how installation steps affect the final result helps you decide whether to shim, slot, or reject the part outright.
Installation Sequence and Pre-Fitting Panels
Correct sportbike fairing fitment starts with sequence, not force. Fit every panel loosely before you tighten any fastener. Loose parts let you shift alignment as a whole, so an error on one panel does not lock into the next.
Follow this order:
- Mount the nose and upper cowl first. Position them loosely and let them define the centerline.
- Work rearward to the side panels. Add each piece after the forward one is seated.
- Keep fasteners partially snug. Leave every bolt and clip hand-tight until all panels are in place.
- Seat all panels, then tighten. Only after everything is resting correctly should you torque the hardware.
The order reduces gap stacking, where small misalignments at the front build into large gaps at the rear. Check each seam along its full length, not just at the mounting points, and look for widening tapers or uneven spacing.
Adjust one panel at a time. Loosen only that panel, reposition it, then recheck the full run before moving to the next. Change two panels at once and you cannot tell which adjustment closed the gap. For general guidance, this overview of how to install modifications on a car follows the same staged, check-as-you-go logic.
Once alignment is confirmed, tighten fasteners gradually in a cross pattern. That keeps the fairing relaxed and prevents the stress that reopens gaps later.
Because nose and side gaps have many possible sources, find the source before adjusting anything. The table below maps common symptoms to likely causes and the checks that confirm them.
| Observed Gap | Likely Cause | Suggested Check |
|---|---|---|
| Gap at the nose-to-side-panel seam | Misaligned or warped nose fairing, or an overtightened front bracket pulling the panel out of position | Loosen the nose fasteners, let both panels relax, then re-tighten evenly and re-measure the seam |
| Uneven gap on only one side | Twisted side panel, bent subframe tab, or a missing spacer on one side | Compare left and right mounting points and measure the panel-to-frame distance on both sides |
| Growing gap toward the rear of the side panel | Worn, sagging, or misaligned rear mounting bracket, or a loose rear bolt | Inspect rear brackets for bends or cracks and verify bolt torque along the rear run |
| Gap that changes with temperature | Thermal expansion of plastic or metal panels, or flexible mounts allowing movement | Measure the gap when cold and warm to confirm movement, then check mount stiffness |
| Gap near a fastener location | Cracked fairing around the bolt hole, missing rubber grommet, or a stripped fastener | Remove the fastener and inspect the hole, grommet, and thread for damage |
| Uniform gap along the entire seam | Mismatched aftermarket panel dimensions, or a panel seated on the wrong mounts | Test-fit against the original panel and confirm every clip and mount is fully seated |
Two causes can co-occur, a slightly warped nose panel and a bent side bracket for example, so recheck the whole assembly after each adjustment. For step-by-step fitting guidance, see these tips on how to install modifications correctly.
Material Flex, Heat, and Vibration
The fairing material you choose affects how well panels hold their shape. Fiberglass is the stiffest of the three common options and has the lowest thermal expansion, but it is brittle under repeated stress. ABS resists bending well, though its relatively high coefficient of thermal expansion means a panel can grow noticeably as it heats up. Polypropylene is the most flexible of the three and tolerates impact and minor distortion, and it expands at least as much as ABS over the same temperature range.
On a running sportbike, engine heat radiates toward the nose while the side-panel mounting points absorb constant vibration. Over time brackets creep, fasteners loosen, and panels shift. Seams that once looked tight begin to open, and panel gaps show up where the panels have shifted.
A flexible aftermarket fairing can hide these problems during installation. Because the material bends, it conforms to uneven mounting points and masks small misalignments in the garage. Once the bike is ridden, heat softens the plastic further and vibration works the panels free, so the hidden gaps return and widen. Rigid materials, by contrast, tend to reveal fitment errors immediately. For a broader look at how such changes influence resale, see this comparison of how modifications can affect vehicle value.
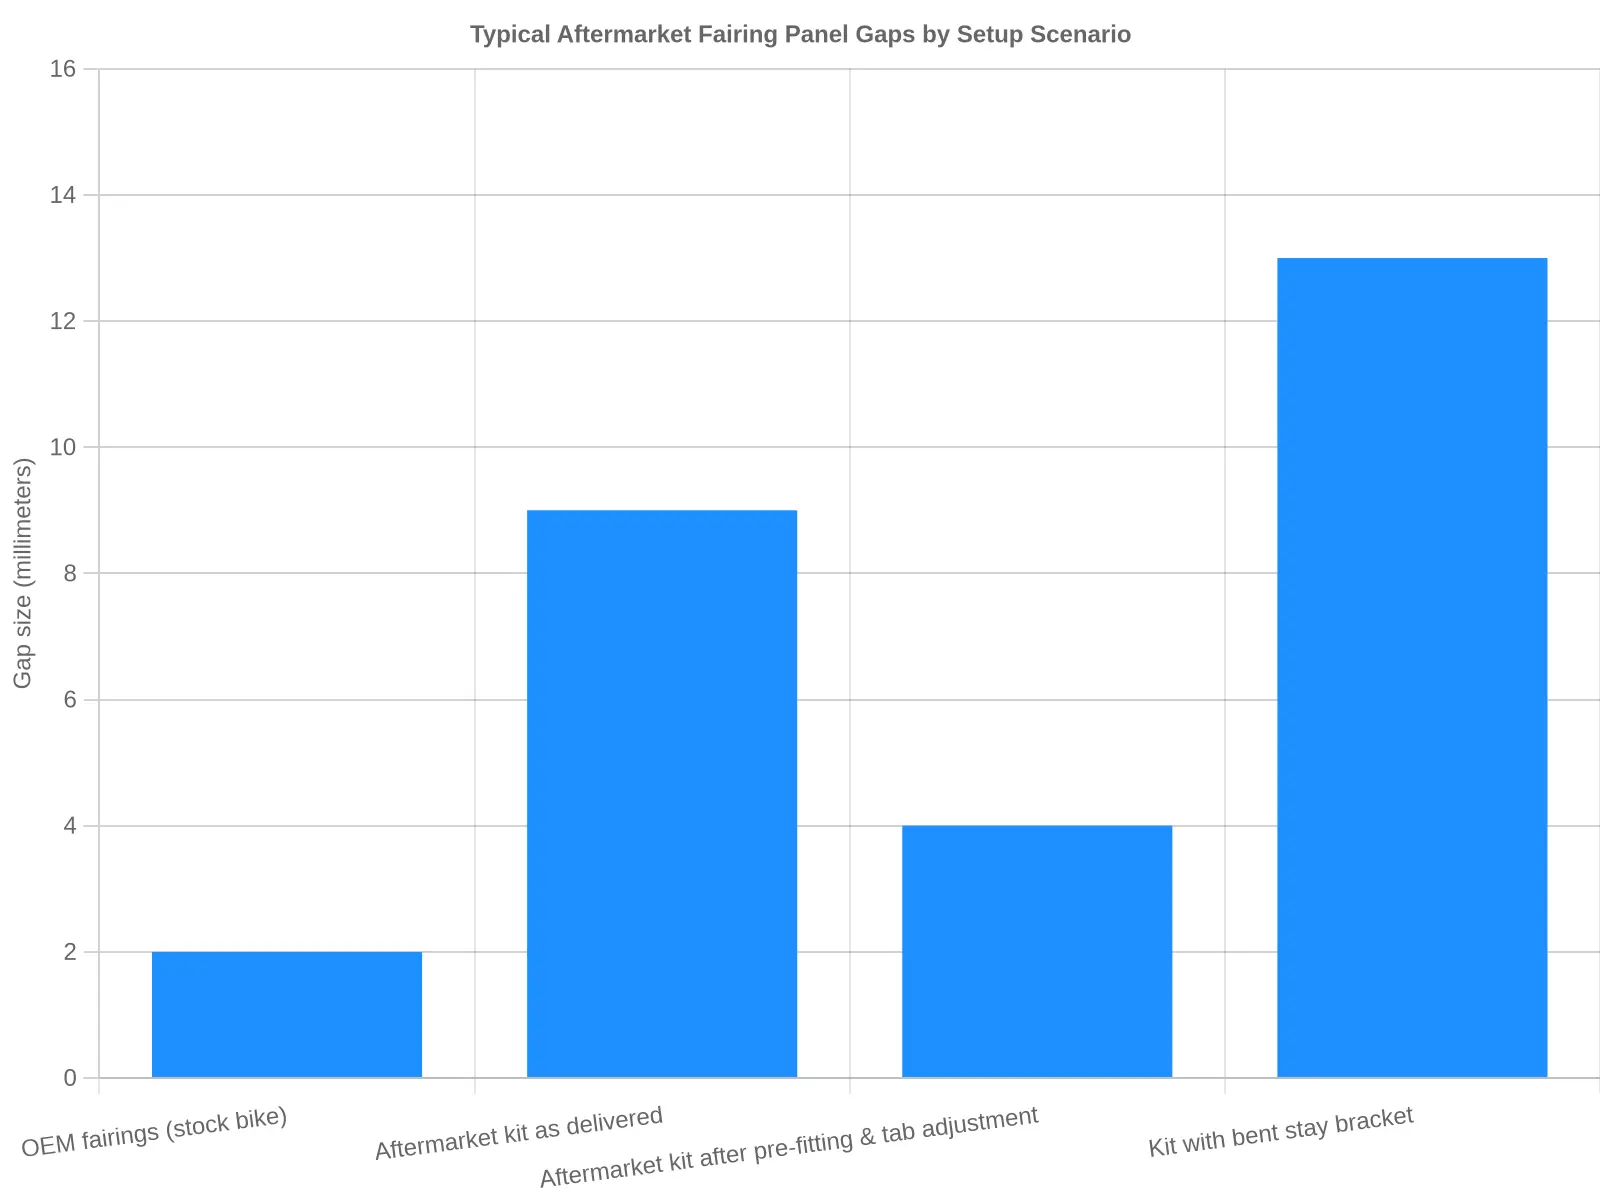
Typical aftermarket fairing panel gaps by setup scenario (gap size in millimeters)
| Setup scenario | Typical gap size (mm) |
|---|---|
| OEM fairings (stock bike) | 2 |
| Aftermarket kit as delivered | 9 |
| Aftermarket kit after pre-fitting & tab adjustment | 4 |
| Kit with bent stay bracket | 13 |
An aftermarket kit installed straight out of the box leaves gaps several millimeters wider than OEM bodywork, but careful pre-fitting and tab adjustment cuts that gap roughly in half. A bent stay bracket pushes panel gaps even wider than an unadjusted kit, so hardware condition matters as much as the panels themselves.
Mismatched nose and side panel lines on a freshly bolted replacement set usually are not a defect in the plastic. They come from two fixable variables: how well the panels were aligned during dry-fitting, and whether the mounting hardware underneath is still true. Check the stay bracket before you blame the kit.
How to Evaluate an Aftermarket Fairing Supplier
Not every vendor selling a motorcycle fairing kit is worth the money. A few practical checks separate reliable sellers from risky ones.
Confirm the kit is listed for your exact model and generation. A 600cc supersport from 2008 and its 2013 refresh may look similar but use different tabs and contours. Ask whether the mounting holes are pre-drilled. Pre-drilled panels reduce alignment errors, while blanks give you flexibility at the cost of extra work.
The listing should name the material and thickness. ABS plastic around 3 mm is common for street use; fiberglass and carbon fiber behave differently. Check that fitting hardware – bolts, grommets, clips, and heat shields – is included, since missing pieces often signal a low-quality kit. Read the return and fitment-guarantee policies too. A clear guarantee is a sign the seller stands behind its molds.
For context on how aftermarket parts can shift a bike or car’s value later, see this guide on how modifications affect resale value.
Summit Fairings sells motorcycle fairings for export, offering over 3,000 styles covering almost all motorcycle models, priced 10-40% below other sites, with a six-hour response commitment for questions. You can review its catalog at summitfairings.com. Weighing these signals across aftermarket fairing suppliers lets you judge a fairing kit on facts rather than marketing claims.
Frequently Asked Questions About Aftermarket Fairing Fitment
Why do nose and side panel gaps appear even on model-specific fairing kits?
The kit is usually not the problem; small manufacturing tolerances are. Aftermarket panels are molded from copies of original parts, so minor dimensional variance and different material thicknesses accumulate across the assembly. Bracket alignment matters too. A subframe that is slightly bent after a tip-over will pull panels out of line, which is why aftermarket fairing fitment often needs minor shimming.
Are small gaps normal on aftermarket fairings?
Yes. A few millimeters of variation is common and generally acceptable, since most sportbike fairing kits are not held to the same tight tolerances as factory panels. A visible gap wider than roughly 5 mm usually points to a mounting or alignment problem worth investigating.
Can gaps be corrected without buying new panels?
In most cases they can be reduced through adjustment rather than replacement. Loosen all fasteners, align the panels by hand, then tighten gradually so stress is distributed evenly. Shimming a bracket or slightly slotting a hole can also close stubborn gaps. A careful installation process makes both easier.
Do grommets and fasteners need replacing with a new fairing kit?
Worn grommets and clips are a frequent cause of loose panels. Fresh rubber grommets, well nuts, and bolts hold panels more securely and absorb vibration better. Many kits ship without hardware, so budget for a proper fastener set.
Does heat from the engine cause panels to shift over time?
Engine and exhaust heat can soften cheaper ABS panels and cause slight movement. Repeated heat cycles combined with vibration gradually loosen fasteners and open gaps. Heat-resistant materials and correct panel clearances reduce this effect. Owners commonly notice it after several seasons.
Is it better to pre-drill mounting holes or drill them during fitting?
Drilling during a dry fit is generally safer for aftermarket fairing work. Test-fit every panel, mark the holes with the panels in place, then drill. Pre-drilling from a template raises the risk of misalignment that is hard to correct afterward.
Bringing Gaps Under Control
Nose and side panel gaps on aftermarket bodywork rarely trace back to a single fault. They usually come from a blend of manufacturing tolerances, the condition of the mounting hardware, and the order in which panels are installed. When all three overlap, even well-made parts sit unevenly against a sportbike fairing, and the misalignment grows as you move back from the nose.
Getting aftermarket fairing fitment right means treating alignment as a process rather than a single adjustment. Small variations add up, and a methodical installation decides whether they cancel out or compound.
Here is a short recap of the practical steps:
- Test-fit every panel before tightening anything down.
- Inspect and replace worn clips, grommets, and bolts.
- Align the nose first, then work outward to the side panels.
- Shim and adjust mounting points gradually.
- Tighten fasteners in sequence to avoid pulling panels out of line.
Once everything is seated, inspect the panels again to confirm the gaps stay consistent.